How To Make a Spread Kindness Not Germs Label with Cricut Joy

Fun Labels

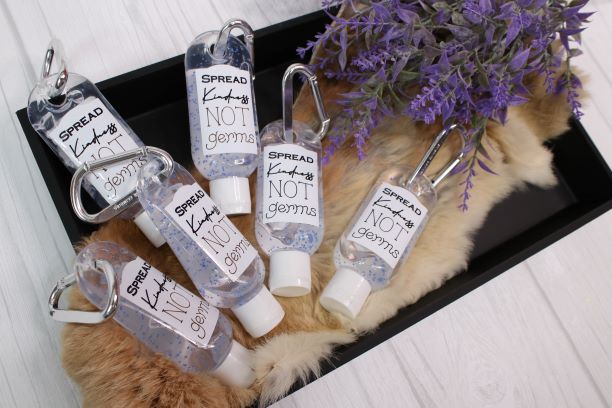
How adorable are these hand sanitizer bottles with the new labels I designed and made?  And how awesome is the fact that all I needed to make them is my Cricut Joy machine, Smart Writable Vinyl, and two Cricut Joy pens?  I can tell you it feels amazing.  I wanted so somehow personalize the bottles to provide as a gift for my customers at our Wild West Photo Shop in Helen, GA.  And although we are practicing social distancing right now, these little gems will come in handy when life goes back to normal and business as usual.  

Get the free file for  your label HERE

Or just fill out the form below.  

Do I need a Cricut Joy?

Just because I used the Joy to make my labels does not mean that you have to.  Use your Cricut Make or Explore machine to do the job.  Of course you will have to cut the writable vinyl to size and place it on your 12″x12″ or 12″x24″ mat, but that is totally doable.  

TOOLS

Cricut Joy ( or Maker/Explore)

Cricut Joy Pens (or Maker Pens)

Mat (for Maker/Explore)

Instructions

Step 1.  Start by doing to my resource library and downloading the Spread Kindness Not Germs label.  Enter the library HERE

Step 2.  Import the Spread Kindness Not Germs Label into Cricut Design Space.

Upload Instructions:
– Go do Cricut Design Space
– Click on New Project
– Click on Upload icon on the left-hand side on the very bottom
– Click Browse and find the downloaded file (make sure you unzip your file and upload the SVG only)

Step 3. Once uploaded, select the file by clicking once and click Insert Image on the lower right-hand corner. Cricut Design Space will take a few moments to upload your file. It may take longer if you file has a lot of elements.

Step 4.  Now you see the Label in Design Space. On the left-hand side you should see the layers of your design.  Design Space provides you with an explanation for every layer. Make sure to change the Cut to Draw on every word in your label. You can do that by clicking on the group of letters to select the whole word (or every letter individually). While the layer is selected go to Linetype in the top menu and change the Cut to Draw. Now repeat this for every word you want your Cricut Machine to Draw instead of Cutting. The only thing you should have as a cut is the outline of the label.

Step 5.  Select the label by clicking on it to view the size. You may drag the corner arrow to make it smaller or larger if you need to. NOTE – if you click to Make It at this time your mat will look something like this. Do not continue with your project. Hit Cancel on the bottom which will bring you back to your canvas. Click on Select All in the top menu and click on Attach on the very bottom of the layers menu. This step will ensure your label attached and the machine will draw first and then cut out the whole thing.

Step 6.  Choose your mat option (or Without Mat) on the left-hand side just below your Mat 1 preview. If you are using a mat make sure to view or move your label around on the preview mat by clicking and dragging it. I chose to cut my labels without the mat. Click Continue.

a. If you choose to use the matless option on Cricut Joy your material has to be at least 4” long. The machine will not cut closer than 1” from top and .5” from the bottom.
b. Do not use transfer tape for the Smart Writable Vinyl
c. Get Pens are not compatible with Writable Vinyl.

Step 7.  Make sure your machine is connected. Choose your machine you want to use in the top menu.

Step 8.  Select the material, I use smart Label Writable Vinyl and use more pressure.
11. Load Black pen (as per the instructions) and load material into machine. The Cricut Joy will feed in the material when it detects it.


Step 9.  Click GO on your computer.

Step 10.  Your machine will prompt you to change pen colors (if you used different colors) and press continue on your computer.

Step 11.  Your machine will prompt you to clip in the Fine-Point Blade and press continue on your computer.

Step 12.  Unload your material from your machine.

And just like this you are done with your label.  You may choose to edit the label by changing the wording.  You may choose to add images or shapes and make it your own.  

The only thing left is to place it on your hand soap bottle or your sanitizer dispenser.  

Enjoy 🙂

Affiliate Links

Craft Vinci may feature affiliate links.  If you decide to make a purchase using these links, I want to thank you from the bottom of my heart for supporting my blog.  It will be at no cost to you.  I also want you to know that I only ever recommend products or services that I truly believe in and used or use myself.